This week's blog entry shall be......A MAKEUP REVIEW!!!!! I don't know about you but I love makeup. And i love it even more when i don't have to pay an arm and a leg for it. Now the buzz when it comes to make up is to get mineral makeup. The whole "let's go green" has successful embedded its thoughts into many people. And now onto the rest of my blog.....
So after completely getting lost on my bike on the way to Elmont. I decided to go to my local TNT. If you don't know, TNT is a liquidator store that sells random home goods like furniture, clothing, school supplies, etc. I went looking for cheap pasta (which i did get: Barilla's Penne Pasta for $0.75) and came out with Kirkland's Borghese Mineral Collection (and some Neutrogena makeup removing towelettes for $2).
I was a bit nervous cuz there was no price tag. But i took it to the counter anyway and got it for $8. That's right $8!!!! Half the price of the Stilla collection that i was debating on getting. I later found out that when it was in Costco it cost roughly $25 ($27 if you bought it online). So i saved around 65% of the retailed value.
Borghese is a high end cosmetics line. You can see their full line at their website. Borghese.com
Now this collection is "Paraban free, oil free and fragrance free"
The Collection came with:
9grams of loose mineral foundation in "Light"
2.8grams of loose mineral bronzer in "Sun Kissed"
1.7grams of looose mineral eyeshadow in 3 colors
"Petal" (soft pink)
"Linen" (Light Taupe)
"Cashmere" (Brown)
2grams of Pressed mineral eyeliner in "Brown"
2 dual sided brushes (eyeshadow, crease, smudge, and eye liner)
retractable blush/bronzer brush
kabuki brush
7grams of Mineral Eyeshadow Base
So now I will review each product:
Mineral Foundation
There are only two colors Light and Medium but medium is too dark for me but Light is barely okay. I'm hoping that by the time its summer my skin will have brighten up and lost its tan. Now when you look at the pigments, it looks shimmery but when you swipe it on its not too noticable. If anything you get a nice soft glow on your face. And of course once you sweep it on you feel nothing on your face. The foundation's active ingredients are :titanium dioxide and zinc oxide, which act as a Spf 15. *LtoRBronzer and Foundation*
Bronzer
The bronzer isn't too dark, it will definately give you a natural sun kissed glow on your face. Again it looks shimmery, but i can't see it on my face.
Eyeshadow
The pigments are INCREDIBLE! They're so beautiful, especially petal. It's a nice highlight color for under your brows. And Linen acts as a nice eyeshadow base and Cashmere will definately give your eyes a nice natural contour and defination on your outter V. It will make your eyes look like its naturally smokey but with some shimmer. A great combination of colors for everyday wear. *LtoR Petal, Cashmere and Linen*
Pressed Eyeliner
The color is a very deep brown. And just like other reviewers have mentioned, because it's pressed poweder coupled with the eyeliner brush, it is fool proof.
Dual Sided Brushes
Eyeshadow/Crease Brush- The eyeshadow is very nice. It's Soft and will pack in the color. However it is on a rather short applicator wand. Around the size of a LA eyeshadow pallete's applicator's size. The crease brush is very small and thin. I think i'd rather use it as a concealer brush. *TtoB Eyeliner/Smudge and Crease/Eyeshadow*
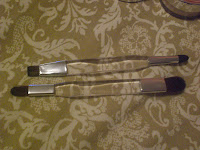
Smudge/Eyeliner- The Smudge Brush is sponge tipped and is not soft. It tugs a bit on your eye which is not good since your eye area is very sensitive. The Eyeliner brush on the other hand is pretty dense and it's a flat eyeliner brush. Coupled with the Pressed eyeliner, it works very well.
Blush/Bronzer Brush
It's a retractable brush so it's perfect for traveling because it will prevent dirt from ruining your brush. It is so dense and soooooo soft~. I love the feel of it on my face, and yes that may sound weird but it truly is a wonderful brush. It's dome shape. The bristles are made of synthetic hair.
Kabuki Brush
Again, it's a dense dome shaped brush and its so soft. I really can't get over how good these brushes are. It's tightly packed and you won't have to worry about the packaging because instead of being attached to a flimsy plastic bottom, the bottom is made of metal like the bronzer brush. The bristles are made of synthetic hair.
Mineral Eyeshadow Base
This base will act as your primer and as such will prevent creasing to hold up your eyeshadow for the day. It also claims to intensify your eyeshadow's color but it was slightly negligable at best then again the eyeshadow is supposed to give a natural look so idk.
And that's all for the review on this great product. I'm so glad i found it <3
Friday, August 27, 2010
Tuesday, August 24, 2010
DIY For the Non Artsy Person
This is for the flower headband for those who do not have any sewing talent (even though mine is pretty half--- but for you guys, you two shall have a flower headband with minimal effort and no sewing abilities required
Tools:
a headband, preferably with a small ribbon (again forever 21 and H&M sell them for cheap, you shouldnt be spending over $4 for a pack of 3 of them) and chiffon flower bobby pins
my ribbon headband (above) has a very small almost un-noticeable ribbon 3/4 of the way up
and my chiffon flower bobby pins ->
**mine cost $1.50 i bought a pack of two ribbon headbands for $1.50 so one cost $0.75 and the bobby pin flowers cost 2 for $1.50, so all together it cost me $1.50 to make this headband sweeeeeeeeeeeet <3 onblur="try {parent.deselectBloggerImageGracefully();} catch(e) {}" href="https://blogger.googleusercontent.com/img/b/R29vZ2xl/AVvXsEgh-apQslAk-rfr3v2SEEjjqhoX4hCxkdqNo5lPPJZhD9SlFdX5w4sBlX9tQvN0-UXIWLVmuHxs8exZD6BIu8lpQw7yr-kucZUSUxF2xVdpf0Qbu-XoubQw2PeCGun4FuSJCB2yi4E22_Y/s1600/headband+015.JPG">
step2: wear it, that's right that's it
Tips: to add more oumph to the head band add another bobby pin flower (preferably another color) to your headband
....................................................................................................................................................................
and voiola a beautiful headband for $1.50 remember bargain hunting is fun and a $12.50 headband from claire's is not!
DIY FTW
So i'm pretty much sick with doing the whole diary blog as you can see.... Why type on the internet when i have a perfectly good diary at home? In any case, instead of day-to-day diary blogging I've decided to create a blog focused on useful things like DIY (do it yourself projects) and product reviews from everything from skincare, cosmetics, household items (woot woot)! So this week today's blog shall be..........
DIY Flower Headbands!!!!!!!!!!!!!!!!!!!!! (inspired by the headband you see at the side)
Are you like me, who is unwilling to pay $8+ on a headband? i mean it's a hair accessory, why should it cost me a shampoo bottle or something? In any case, here we go:
Tools:
Chiffon or Ribbon, Scissors, Needle, Thread(same color as your chiffon/ribbon), and a plain headband (preferably not plastic), and a small safety pin
Tips: to get a really simple, plain headband with a bow go to forever 21 and they sell a pack of 3 for less than $4, (i got two for $1.50 scoreeeee)
Instruction:
Step1: garb you chiffon or ribbon and cut them into 10 squares, approx. 5cm on each side
step2: take two of the pieces and lay them flat on top of once another at different angles, i'd suggest one is faced like a square and the second one like a diamond
these two pieces will act like the leaves for your flower
step3: take your third square and pinch it in the middle or center of the square, (it will kind of look like a flower)
step4: take this piece (still pinching the the chiffon towards the center) and with your needle and thread, sew the sides together (so you no longer have to pinch it in order to make it look like a flower) we will be using this piece as a petal
step5: sew this piece (through the center of the petal) onto the center of the original two suares that will be the leaves
step 6: repeat steps 3-5 for the other 7 pieces and this will create your flower :D What it should sorta look like ->
step 7: flip your flower upside down (so the you are looking at the back of the leaves) and take your safety pin and pin the needle through the leaves (one side to another)
<- what it should look like step 8: take the pinned flower and attach the pin onto your headband (preferably 3/4 of the way up the head band) and viola you have an expensive looking headband :D
Tips: to add a little more spice to your headband, you can take and old, inexpensive faux pearl earing (for pierce ears, and again forever 21 sells them for cheap) and take the pointed part of the earring and push it through the center of the flower and secure it using the back of the earring piece)
what it should look like ->
....................................................................................................................................................................
And your final product:
Its so pretty and soft to the touch and no one else will have the exact same one <3
Subscribe to:
Posts (Atom)